


Introduction
The world of trading is fraught with uncertainties, but one thing is clear: discipline is key. One crucial tool for enforcing discipline is a well-crafted trading checklist. This article will explore the profound impact a trading checklist can have on your trading activities. We will also highlight the difference between a trading plan and a trading checklist, ensuring that you grasp the significance of each in your trading journey.
Why Use a Trading Checklist?
Utilizing a trading checklist is not merely a recommendation but a necessity for consistent, disciplined trading. It instills a sense of discipline, ensures that you adhere to your trading plan, and boosts your confidence by reinforcing the rationale behind every trade you make.
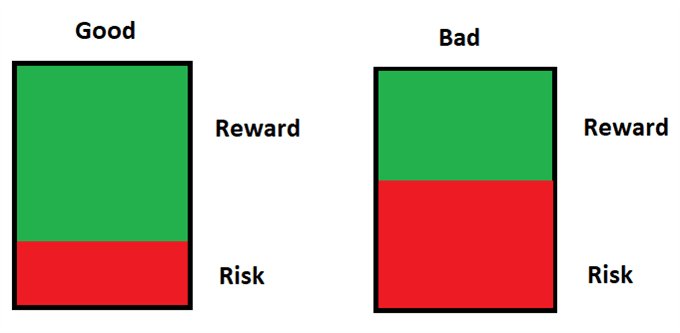
Risk to Reward Ratio: The Cornerstone of Thoughtful Trading
Understanding your risk to reward ratio is not just a one-off exercise but a pivotal element of any sophisticated trading checklist. This critical metric essentially serves as a numerical representation of your trading philosophy, encapsulating how much financial risk you’re willing to undertake for a potential reward. However, there’s more to it than just understanding the basics; it’s about applying the ratio intelligently and consistently to every trading decision you make.
The Mechanics
First, let’s delve into the mechanics. The risk to reward ratio is calculated by dividing the distance from your entry point to your stop-loss by the distance from your entry point to your take-profit point. For example, if you’re willing to risk losing 50 points to potentially gain 150 points, your risk to reward ratio would be 1:3. This implies that you stand to gain three times what you’re willing to risk.
Psychological Edge
Knowing your risk to reward ratio gives you a psychological edge. There is reassurance in knowing that you can be wrong in a few trades and still end up profitable in the long run. When you set up trades with a high reward potential compared to the risk involved, it helps ease the mental burden that comes with inevitable losses, making it easier to stick to your trading plan.
Risk Management
It’s a fundamental tenet of risk management. By committing to a disciplined risk to reward setting, you safeguard your capital. This could be especially vital during volatile market conditions, where the risk of significant losses is elevated. This approach helps you to keep the big picture in mind, preventing emotional or impulsive decisions that deviate from your trading plan.
Dynamic Adjustments
Another advantage of having a risk to reward ratio in your trading checklist is the ability to make dynamic adjustments. Market conditions are not static; they can change rapidly within a short period. A set risk to reward ratio serves as a guiding post, helping you to adjust your stop-loss or take-profit points in real-time according to the changing market environment.
Symbiosis with Other Checklist Items
The risk to reward ratio doesn’t exist in isolation. It often works in symbiosis with other elements on your checklist like market indicators, economic releases, and capital risk management. For example, in a trending market, traders may feel more confident in taking on trades with a higher risk for a potentially higher reward. Conversely, during major economic releases that could introduce uncertainty, a more conservative risk to reward ratio could be advisable.
Integrating a well-defined risk to reward ratio into your trading checklist is like having a built-in risk management consultant at your fingertips. It will guide your trading decisions, ensuring they are aligned not just with your immediate objectives but also your long-term trading strategy. With a focus on risk to reward ratio, you are setting yourself up for sustainable success, rather than leaving your trading outcomes to mere chance.

Economic Releases: Navigating the Market’s Pulse Points
Trading is far from an isolated endeavor; it exists within the context of a dynamically shifting economic landscape. One of the most influential external factors affecting the financial markets is economic releases. These include crucial data points like Non-Farm Payrolls (NFP), Consumer Price Index (CPI), and Gross Domestic Product (GDP), among others. Including a review of upcoming economic releases in your trading checklist is imperative for risk mitigation and seizing profitable opportunities. Here’s why and how you should focus on economic releases in your trading strategy.
Unpacking the Releases
Understanding what each economic indicator signifies is the first step. For instance, the NFP reports the number of jobs added or lost in the economy over the last month, excluding the farming industry. A significant change in this figure can trigger market volatility. The CPI, on the other hand, gauges inflation by measuring changes in the cost of consumer goods and services. GDP is perhaps the broadest indicator, representing the total market value of all finished goods and services produced within a country. Each of these plays a specific role in impacting asset prices and market sentiment.
Timing is Everything
Economic releases are usually scheduled and are available on economic calendars accessible to traders. Knowing the timing of these releases allows you to plan your trades strategically. For example, if you know that a significant GDP announcement is coming up, you may opt to close a potentially risky position or enter a new trade to capitalize on the expected volatility.
Risk and Volatility
The period leading up to and immediately after an economic release can be a double-edged sword. While volatility can offer lucrative trading opportunities, it also amplifies risk. By being aware of the timing and potential impact of these economic indicators, you can adjust your risk management strategies—like setting wider or tighter stop-losses and take-profits—accordingly.
Synergy with Other Factors
Economic releases should not be considered in isolation but rather as part of a cohesive trading strategy. They often correlate with other checklist factors like risk to reward ratio and market indicators. For example, a strong NFP result might validate a bullish stance in a trending market, allowing for a more aggressive risk-to-reward setting. Conversely, a disappointing CPI could signal higher inflation and bearish sentiment, warranting a more cautious approach.
Utilizing Technology
In this digital age, traders have a plethora of tools to keep track of economic releases. There are specialized apps and platforms that send real-time notifications about upcoming economic events, which can be tailored to fit your trading interests and needs. Leveraging such technologies can give you a competitive edge in a fast-paced trading environment.
By making economic releases a mandatory checkpoint on your trading checklist, you ensure you’re not blindly walking into a market minefield. It adds a layer of due diligence to your trading process, helping you to make more informed decisions. Economic releases are like the weather forecasts of trading; they don’t give you the exact future but provide you with an idea of the conditions you’re likely to face, allowing you to prepare accordingly.
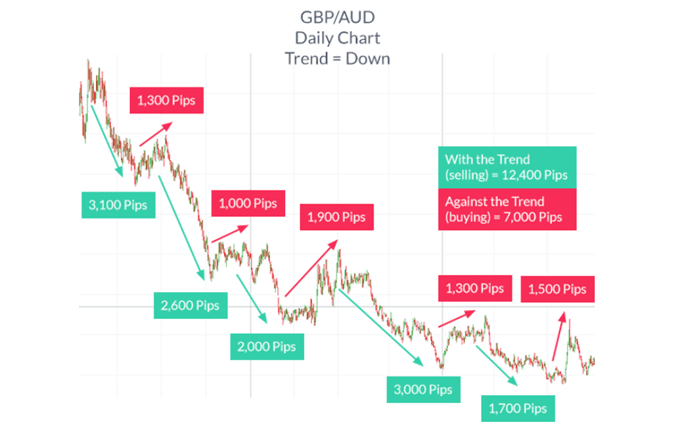
Trending Markets
When trading financial markets, it’s crucial to identify the broader market condition you’re stepping into. This is where understanding the concept of trending markets comes into play. A trending market—whether it’s heading upward (bullish) or downward (bearish)—offers a plethora of opportunities for traders who can correctly identify and ride the trend. Including a checkpoint for market conditions, particularly for identifying trending markets, should be a non-negotiable item on your trading checklist. Here’s how to delve deeper into this crucial concept and integrate it into your trading regimen.
Identifying a Trending Market
The first step is knowing how to spot a trend. This typically involves analyzing price action and employing various technical indicators like Moving Averages, the Relative Strength Index (RSI), or trendlines. A trending market is generally characterized by higher highs and higher lows in an uptrend or lower highs and lower lows in a downtrend. Recognizing these patterns early can provide a trader with valuable insights into potential entry and exit points.
Why Trends are Important
The saying, “the trend is your friend,” encapsulates the essence of why understanding trending markets is vital. Trends offer a directional bias that can simplify your trading decisions. They provide a kind of ‘path of least resistance,’ where trading in the direction of the trend often results in higher probability trades. This is because, in a trending market, the likelihood of the price continuing in the same direction is often greater than it reversing course.
Risk Management in Trending Markets
Understanding that a market is trending can significantly impact your risk management strategy. For instance, if you’re trading in the direction of a strong uptrend, you might place your stop-loss below a recent ‘higher low’ to give your trade room to breathe while still capping potential losses. Conversely, in a downtrend, a stop-loss might be placed above a recent ‘lower high.’
Combining with Other Checklist Items
Recognizing a trending market shouldn’t be an isolated task but should be integrated with other elements of your trading checklist. For example, your risk to reward ratio may be more favorable when trading with the trend. Similarly, understanding the economic releases that could impact the strength and sustainability of a trend is equally crucial.
The Role of Timeframes
It’s essential to understand that trends can exist in multiple timeframes—short-term, medium-term, and long-term. Your trading strategy should dictate which timeframe is most relevant for you, but always be aware that trends can and do interact across timeframes. A long-term bullish trend could very well contain short-term downtrends. Being aware of these intricacies can save you from making ill-timed trading decisions.
Capitalizing on Trending Markets
Active traders often employ trend-following strategies that capitalize on momentum. These strategies might include entering on pullbacks within a trend or using breakout patterns to confirm a trend’s strength. Whatever your specific approach, understanding that the market is trending can help you adjust your tactics to be more in line with the prevailing market conditions, thereby increasing your odds of a successful trade.
By making the identification of trending markets a cornerstone in your trading checklist, you not only improve your chances of entering high-probability trades but also enforce a disciplined approach to trading. In a nutshell, understanding trending markets is not just an option; it’s a necessity for anyone serious about trading effectively.
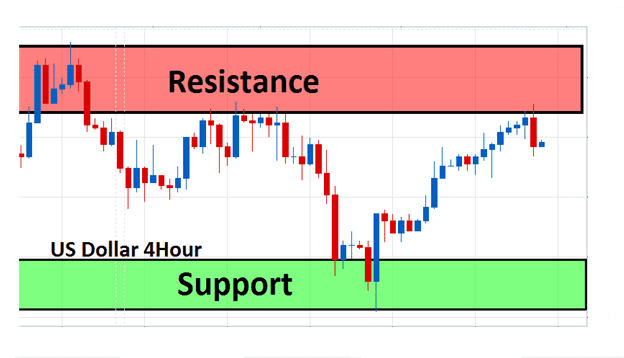
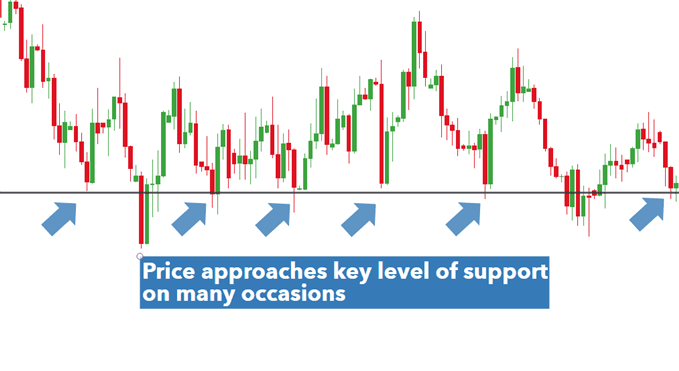
Support and Resistance: Vital Signposts in Your Trading Checklist
In the realm of trading, few concepts are as universally acknowledged and utilized as support and resistance levels. These critical zones on a price chart serve as psychological barriers where the price action is likely to experience friction, either bouncing back or breaking through. Incorporating these levels into your trading checklist not only helps in defining your entry and exit strategies but also provides a fuller understanding of the market landscape. Here’s how to deepen your grasp of support and resistance and make them indispensable parts of your trading checklist.
The Fundamentals of Support and Resistance
At its core, a support level is a price zone where a downtrend can be expected to pause, due to a concentration of demand (buyers). Conversely, a resistance level is a price point where a trend can pause or reverse due to a concentration of supply (sellers). Traders utilize these levels to identify entry and exit points, set stop-loss orders, and evaluate the risk-to-reward ratio for a particular trade.
Importance in Various Market Conditions
The relevance of support and resistance levels isn’t confined to trending markets; these levels are equally important in ranging or sideways markets. In trending conditions, traders may use support levels to enter new long positions or set stop-losses when the price is trending upward. Resistance levels may be employed in a similar fashion but in the opposite direction. In a ranging market, these levels can signify the boundaries of the range, providing ideal buy or sell signals when the price bounces off them.
Role in Risk Management
One of the most critical aspects of trading is effective risk management, and understanding support and resistance levels can be a powerful tool in your risk-mitigation arsenal. For instance, setting a stop-loss just below a support level in an uptrend or just above a resistance level in a downtrend can maximize your chances of cutting losses early while giving your trade sufficient room to breathe.
Confirmation Through Other Indicators
Although support and resistance levels can be potent on their own, they are often best used in conjunction with other technical indicators. For example, a resistance level being broken with high trading volume might offer a stronger confirmation of a breakout. Similarly, indicators like Moving Averages, Fibonacci retracements, or RSI can add layers of confirmation, making your trade setups more robust.
Adaptability and Evolution
Support and resistance levels are not static; they evolve over time. A broken resistance level can often turn into a support level in the future, and vice versa. Therefore, constant monitoring and adaptation are necessary for maximizing their utility. As you update your trading checklist, it’s prudent to reassess these levels to ensure they are still relevant.
The Interplay with Economic Releases
Moreover, significant economic events, like central bank meetings or employment reports, can cause substantial price gaps, temporarily rendering existing support or resistance levels irrelevant. Being aware of such events via your trading checklist can prepare you for these market anomalies.
By dedicating a section of your trading checklist to understanding and applying support and resistance levels, you’re equipping yourself with a proven, time-tested tool that enhances your market analysis, improves trade timing, and bolsters risk management strategies. In short, support and resistance levels are not merely optional elements to consider; they are fundamental components for anyone committed to trading success.
Capital Risking
The topic of capital risking is not just a line item on a trading checklist; it’s a cornerstone for sustainable trading and financial well-being. When traders ignore this vital element, they may find themselves facing crippling losses, and in extreme cases, even account liquidation. Below, we expand upon the multi-faceted nature of this critical aspect, underscoring why it should be a mandatory part of your trading checklist.
Understanding Risk Capital
First and foremost, it’s crucial to define what constitutes ‘risk capital.’ This is the portion of your investment funds that you are willing and able to lose without affecting your lifestyle or financial stability. The percentage of risk capital you allocate toward a single trade becomes the foundation upon which the rest of your risk management strategy is built.
The Psychological Factor
The amount of capital you decide to risk is closely tied to your psychological comfort. Placing an overly large percentage of your account in a single trade could lead to stress, causing you to make impulsive decisions like prematurely exiting a position or moving a stop loss. These decisions could impair your strategy and result in substantial losses, which is why you should risk only what you can emotionally afford to lose.
Setting Risk Limits: Fixed vs. Variable
There are different ways to set your risk limits. Some traders prefer a fixed percentage for all trades, such as 1% or 2% of their total account balance. Others might use a variable percentage based on the perceived opportunity or risk level of a particular trade. The key is to have a well-thought-out method that aligns with your overall trading strategy and risk tolerance.
Capital Risking and Position Sizing
Your decision on how much capital to risk also influences your position size, i.e., the number of shares or contracts you will trade. Various position-sizing models exist, from the simple fixed-share size to more complex algorithms that take into account your portfolio’s volatility. Your trading checklist should guide you through this decision-making process.
Synergy with Other Checklist Items
The capital risking component on your checklist doesn’t operate in a vacuum; it must be considered in tandem with other aspects like the risk to reward ratio, support and resistance levels, and potential impact of economic releases. For instance, you might be willing to risk more capital if the risk-to-reward ratio is particularly favorable and the trade is well-supported by technical indicators.
Regular Reviews and Adjustments
As with any aspect of a dynamic trading environment, your risk parameters should not be set in stone. As you gain more experience, hit winning streaks, or face drawdowns, revisiting and, if necessary, adjusting your risk levels can keep your strategy aligned with your evolving circumstances and market conditions.
Trade Execution
The endgame of adhering to a well-crafted trading checklist is effective trade execution. Think of your trading checklist as the series of stepping stones that lead you across the river of market uncertainty to the other side, where a potentially profitable trade awaits. A checklist serves as both a safeguard and a guide, eliminating emotional, impulsive decision-making that can easily cloud your judgment in the heat of the moment.
By methodically working through each item on your trading checklist, you gradually build a comprehensive picture of the market conditions, the risks involved, and the potential for reward. This not only eases the psychological stress often associated with trading but also increases the likelihood of executing a successful trade.
Therefore, trade execution is not just a mere ‘click of a button’ moment. It is the culmination of all the prior steps and considerations on your checklist. By the time you arrive at this final stage, your actions should be a calculated outcome of a disciplined process. This enhances your probability of success in the market, making your trades less a gamble and more a result of reasoned strategy.
Market Indicators
While the focus of your trading checklist involves core components like understanding the market condition, risk to reward ratio, and economic releases, market indicators serve as the supplementary tools that refine your trading decisions. These indicators, such as moving averages, Bollinger Bands, and the Relative Strength Index (RSI), act like the seasoning in a well-cooked meal; they’re not the main ingredients, but they add depth, complexity, and nuance that make the dish complete.
For example, moving averages can help smooth out price action, giving you a clearer picture of the market’s general direction. This is especially useful in a trending market where you want to confirm that the existing trend has legs. Bollinger Bands can indicate levels of volatility, allowing you to better assess the risk and potential of a particular trade. When the price touches the upper or lower band, it might signal an overbought or oversold condition, providing an additional layer of information for your trading decisions.
The Relative Strength Index (RSI), on the other hand, is particularly effective in identifying momentum. It can signal whether an asset is considered to be overbought or oversold, giving you clues about potential reversals in the market. This is extremely beneficial when trading in ranging markets, where identifying tops and bottoms can be crucial for successful trades.
Trading Strategy
Your trading checklist isn’t just a stand-alone tool; think of it as an integral extension of your overarching trading strategy. While your strategy outlines the bigger picture—your goals, the assets you’ll trade, your risk tolerance, and more—the checklist dives into the details, ensuring that each trade you make aligns seamlessly with your established strategy.
For instance, if your trading strategy involves capitalizing on short-term market movements, your checklist would include specific criteria to identify these opportunities. It may involve monitoring particular indicators or economic releases that have a short-term impact on the market. The checklist acts like a filter, allowing only those trades that meet your pre-established conditions, thus increasing your chances of a profitable trade.
Moreover, a well-crafted trading checklist contributes to trading discipline. The market is a volatile space; emotions can run high, and the temptation to deviate from your initial strategy can be strong, especially in the heat of the moment. This is where your checklist comes into play. By sticking to a checklist that’s rooted in your strategy, you make each trade a disciplined action rather than an emotional reaction.
Your Comprehensive 7-Step Trading Checklist: A Deep Dive for Informed Trade Execution
Navigating the complex landscape of trading can be intimidating, but not when you are equipped with a well-crafted trading checklist. Think of this checklist as your roadmap, guiding you through each crucial consideration that deserves your attention before you hit that ‘buy’ or ‘sell’ button. Let’s delve deeper into each of these seven steps.
- Is the Market Trending or Ranging? As the first item on your checklist, this serves as your initial filter. A trending market can offer higher probability trades, but a ranging market could present equally lucrative opportunities if you know how to play support and resistance levels. The key here is to adapt your trading strategy to the market environment, optimizing your chances for a successful trade.
- Is There a Significant Level of Support or Resistance Nearby? Support and resistance levels act like invisible barriers in the market. Knowing where these levels lie helps you set your entry and exit points more effectively. If a significant support or resistance level is nearby, it might influence whether you enter a trade and where you place your stop-loss and take-profit orders.
- Is the Trade Confirmed by an Indicator? Indicators, like moving averages or the Relative Strength Index (RSI), can provide a second layer of validation for your trade. They help you identify high-probability trades and can confirm or challenge your market bias. However, relying solely on indicators can lead to ‘paralysis by analysis.’ Use them to inform your decisions but not to dictate them entirely.
- What is the Risk to Reward Ratio? Here, you evaluate the potential profitability of a trade compared to the risk involved. A positive risk to reward ratio can make even a trade with a lower probability of success viable. Ensure that your potential reward justifies the risk you’re about to take, keeping your trading account healthy in the long run.
- How Much Capital am I Risking? Allocating your trading capital wisely safeguards your account from disastrous losses. You’ll need to decide what percentage of your trading account you’re comfortable risking on this particular trade. Whether it’s a fixed or variable percentage, this choice is a cornerstone of your risk management strategy.
- Are There Any Significant Economic Releases That Can Impact the Trade? Information is your greatest asset and your greatest liability in trading. Scheduled economic releases, like Non-Farm Payrolls or GDP reports, can dramatically swing the market. Being aware of such events can help you decide whether to proceed with a trade or sit it out.
- Am I Following the Trading Plan? Finally, you must ask yourself if this trade aligns with your overall trading plan. A well-considered trading plan acts as your foundational strategy, and deviating from it often leads to inconsistent results. Ensure that the trade you are about to execute fits into the broader context of your trading objectives, styles, and risk parameters.
Think of this 7-step trading checklist as your co-pilot. It doesn’t replace your intuition or experience, but it does serve as a disciplined approach to ensure that you’re not missing any vital steps before executing a trade. This not only improves your decision-making process but also enhances your risk management, making you a more resilient and effective trader in the long term.
Conclusion
Having a trading checklist is akin to having a trusted advisor by your side. It ensures that you are prepared, disciplined, and confident in your trading activities. We’ve covered a lot of ground here, from understanding risk to reward ratios to factoring in economic releases and market conditions.
Click here to read our latest article on How to Create the Ultimate Trading Plan
FAQs
- What is the importance of a Trading Checklist in executing successful trades? A trading checklist serves as a structured guide to help traders adhere to their trading plan, maintain discipline, and build confidence. It helps in the step-by-step evaluation of trades before execution.
- How does the Risk to Reward Ratio factor into a comprehensive trading checklist? The Risk to Reward Ratio is crucial for understanding how much you are willing to risk to gain a particular amount. It guides you in setting your stop-loss and take-profit points, ensuring that you are not entering into trades blindly.
- Can you explain how Economic Releases like NFP, CPI, and GDP impact trading decisions? Economic releases can greatly affect market volatility and direction. Including them in your trading checklist helps you plan for these variables, avoiding unnecessary risks and capitalizing on market movements.
- What does the article mean by Trending Markets and how does it affect my trading checklist? Trending Markets refer to market conditions where prices are moving consistently in one direction. Identifying whether the market is trending or ranging is a key component of the checklist, affecting the choice of trading strategy.
- How do Support and Resistance levels contribute to a trader’s decision-making process? Support and Resistance levels act as significant barriers in price action, helping you set entry and exit points. Including these levels in your checklist provides invaluable insights into market conditions.
- What guidelines does the article provide for Capital Risking in a trading checklist? The article emphasizes the need to decide how much capital or percentage of capital you’re willing to risk in each trade. This ensures that you’re not making reckless trades that could endanger your entire trading account.
- How does a trading checklist help in better Trade Execution? A well-prepared trading checklist streamlines the trading process, reducing stress, and improving the odds of successful trade execution. It’s the final step that combines all elements of the checklist into actionable insights.
- What role do Market Indicators like moving averages and RSI play in confirming high-probability trades? Market Indicators serve as additional layers of confirmation for your trades. While they should not be the sole basis for a trade, they are useful in providing extra assurance and fine-tuning your entry and exit points.
- How is a trading checklist related to your overall Trading Strategy? Your trading checklist is essentially an extension of your overall trading strategy. It helps you to remain focused, consistent, and disciplined in following your established trading methods.
- Does the article offer any tips for staying updated on Economic Releases that might affect my trades? The article recommends using economic calendars and other tools to keep track of major economic releases, thereby helping you to plan ahead and integrate this information into your trading checklist.

Call to Action
The difference between a mediocre trader and a successful one often comes down to discipline and preparation. Make a commitment today to implement your trading checklist. For a deeper understanding and practical tools, check out our additional resources on edgeforex.
By integrating these practices, you’re not just making a trade; you’re building a career.
Click here to know more about Trading Checklists